How To Add Related Post Widget To Your Blog Or Custom Domain
Related Posts at the foot of your blog can be highly effective to draw more traffic for you. Related posts grow more interest among the viewers to go through a number of posts of your blog. True, 'Popular Post' in either left or right side bar also attract the visitors, still a few colorful thumbnail below the last line of a post is bound to create a positive impression among the readers and he/she is most likely to visit your blog again.
Related posts also help you :
- To reduce 'bounce rate' ( Bounce rate is the percentage of visitors who arrive at your blog/website without visiting another page).
- To convert the casual visitors into regular visitors
- To add SEO value to the internal pages
Go To Linkwithin :
#1) Visit the link above, you will find a form as shown below:-
Screen Shot:1

Put your email address, url of your blog. Then choose from the 'drop down menu' your platform viz. Blogger/Wordpress/TypePad/Other. Then from the 'Width drop down menu' select how many posts of yours you want to show at the foot of your blog/website. It may be 3, 4 or 5. Just below it tick the box if your blog has light text on a dark background.
Now click Get Widget
How To Install The Widget :
#2) After clicking the 'Get Widget' button you will be led to the following page of your blog (you have to be logged in) :-
Screen Shot:2

Click Install Widget html link at the top left and you will be led to the following page of your blog :-
Screen Shot: 3

Choose the preferred blog from the 'Select a blog drop down menu'.
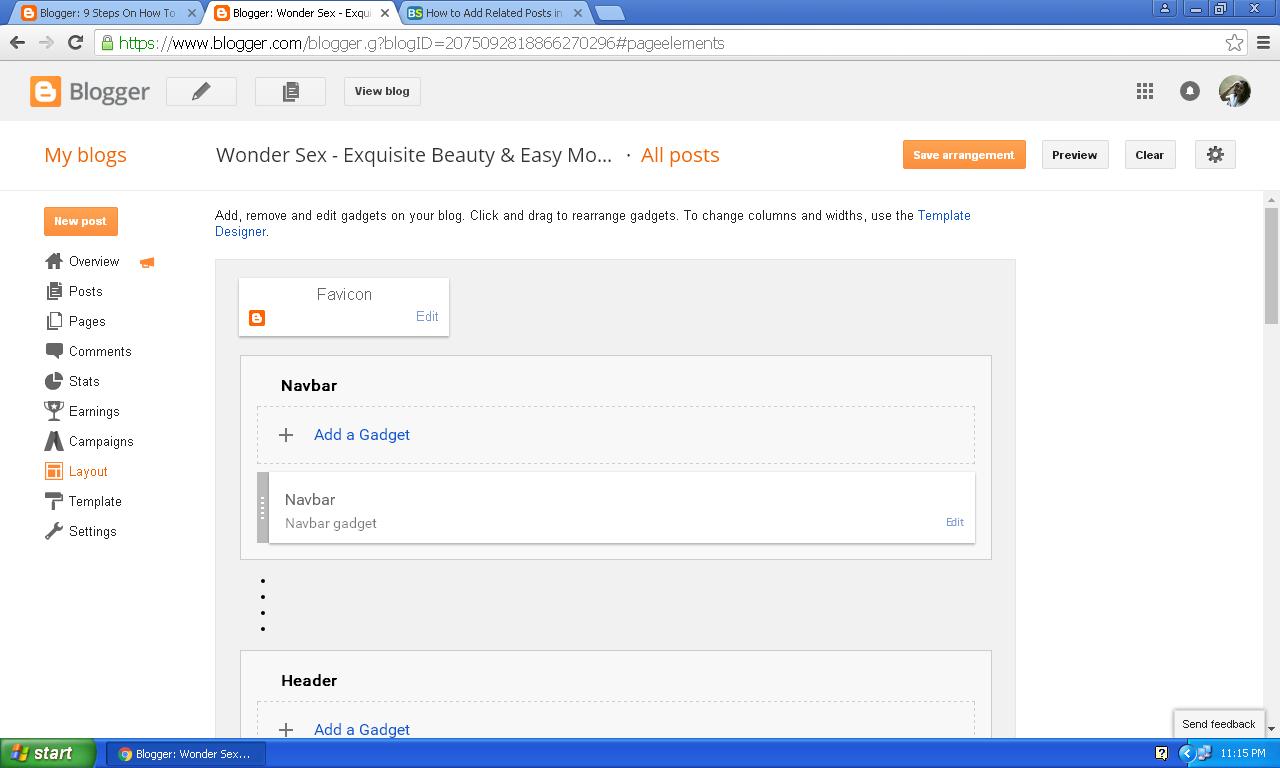
Click 'Add Widget' and now you will be led to the 'layout' page of your blog as follows :-
Screen Shot: 4
Now click 'Save arrangement' at the top right corner and you have done it. Visit your blog and you will be thrilled to find 'Related Posts" appearing at the footer instantly.
IMPORTANT
If you have bought and added a custom domain such as .com / .in / .org with your blog, then follow the following steps to add 'Related Post' widget to it :-
#1) After noting email address and url of your custom domain, select 'other' in the 'Drop Down' menu of 'Platform' (Refer Screen Shot 1).
#2) After clicking 'Get Widget' you will be led to the page as shown below:-
Screen Shot: 5

#3) Now, the html code as shown in the box above(Screen Shot:5) is to be pasted before the </body> tag in your blog template. Do it as described below:-
Log in to your blog. Go to template and click Edit HTML. A box full of html codes will open. Now click anywhere in that box and press Ctrl+f. A small box at the top right corner will open --Screen Shot:6
Screen Shot: 6

Now, type </body> in that box and hit enter, you will find </body> marked yellow at the bottom. Watch Screen Shot: 7
Screen Shot: 7

Now copy the html code in the box (Screen Shot: 5) and paste it just above the </body> tag (Screen Shot:
7) and click 'save template'. Hit Back button - My blogs. You will be pleased to see Related Posts appear at the foot of your website instantly.
Share this post with your friends so that many more get benefited.
No comments